How To Hydro Dip A Cow Skull With Spray Paint
Hydro dipping with spray paint is a popular method of painting three-dimensional (3D) objects.
Generally speaking, the hydro dip technique can be used for painting a wide variety of items: If you can paint it and also get it wet, it's a candidate for hydro dipping. Among other items, hydro dipping is popular for painting animal skulls, including cow skulls.
The basics of hydro dipping a cow skull or another item with spray paint (there are other methods; see the bottom of this page) is simple: Spray paint is sprayed onto the surface of water. When an object is slowly dipped through the paint and into the water below the paint gently flows around and onto all the dimensions of the object.
The exact result of the paint job is unpredictable - the paint goes wherever the water happens to carry it - but the results typically create unique patterns that are very attractive.
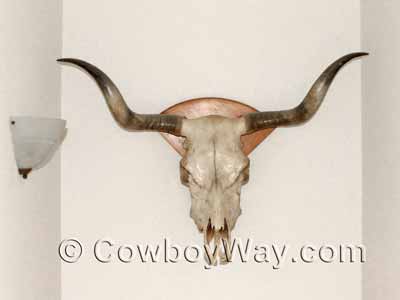
Here at CowboyWay.com we had a nice Longhorn cow skull hanging in a stairway to our basement. We chose this particular skull for this location because her horns were small enough to fit into the narrow area, but then we noticed we had a problem: The white (or slightly off-white) skull blended in with the off-white paint of the stairway.
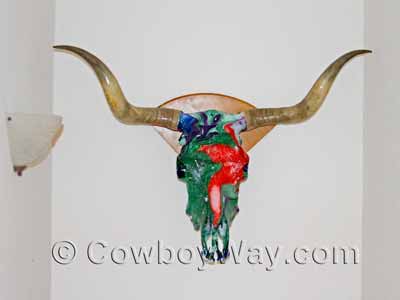
While we prefer a natural look with most of our skulls, this one blended in so well with her surroundings that no one, including ourselves, hardly ever noticed her. So, we decided to go bold and paint her using the hydro dip/spray paint method so she would be more noticeable.
Below: Before - Our white (actually, slightly off-white) Longhorn cow skull in an off-white stairway.
Below: After - The same cow skull after being hydro dipped. She is much more noticeable.
Did you know...?
Hydro dipping is also called hydro
graphics, immersion printing, or water transfer printing.
Items You Will Need To Hydro Dip A Cow Skull
- A clean (free from dirt, dust, etc.) cow skull.
- Spray paint. You can use one or several colors.
- Water.
- A water-tight container large enough to submerge the skull you want to
hydro dip.
Make sure the container
is large enough that the skull can be submerged without causing the water to
overflow. If water runs over you might lose paint and not get good
coverage on your skull.
- NOTE: For smaller items to be dipped containers such as buckets, feed tubs, mineral tubs, and similar sturdy-walled items often work well. Plastic storage containers commonly found for sale in stores might also work well, but some of them are not strong enough to hold their shape when filled with water. If in doubt about how sturdy your container is, you might want to fill it with water beforehand to make sure it can hold its shape.
Optional Items That Are Good To Have
- Paint to give your skull a base coat of color. This can be spray paint or some other type of paint. Since there are likely to be areas of your skull that don't get covered with paint when you dip it, applying a base coat lets you choose the color that shows through. If you decide to give your skull a base coat make sure it has time to completely dry before dipping.
- A disposable stick to gently swirl the paint after it has been sprayed onto the surface of the water, before the skull is dipped. Swirling the paint helps to break up large blocks of any one color. You might not want to swirl the paint, but if you do a disposable stick is a handy item to do it with.
- A small piece of scrap cardboard (or something similar) to part the surface of the water after you submerge the skull and before you lift it back out. You don't have to part the water: You can simply lift the skull back out through any remaining paint left on the surface. However, most people seem to prefer the "look" of the skull with one coat of paint (the dip going in) instead of two coats (picking up additional paint as the skull is lifted out).
- If your skull has horns you might also need masking tape or something similar to mask them off if you don't want paint on them when you apply a base coat, and/or when you dip the skull.
- If you want to keep paint residue off the inside of the container you're using you will need plastic sheeting or something similar to line the inside of the container. Depending on the size of the container a large trash bag or a drop cloth might work well.
- Protective gloves to keep paint off your hands.
- Spray sealant to seal the skull after it has been dipped and had time to dry.
You might like these items. Or, Article continues below.
Hand painted skulls from Etsy. Article continues below.
How To: Hydro Dipping A Cow Skull With Spray Paint
Step One
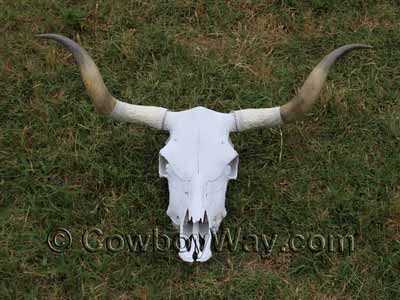
The first thing you probably want to do is paint your skull with a base coat of color. This is optional, but is often a good idea. There are likely to be areas that don't get covered with paint when the skull is dipped, and with a base coat you get to choose the color that shows through.
For our own skull we gave it a base coat with white spray paint. We didn't want any white paint on the horns, so we covered them at the base with masking tape. Make sure the base coat is thoroughly dry before hydro dipping.
Below: Our cow skull after being sprayed with a base coat of white. We covered the base of the horns with masking tape so the horns wouldn't get painted.
Step Two
Gather the items you will need to hydro dip your skull (listed above under "Items You Will Need..."). Hydro dipping is fast and easy, so you'll want all your items ready. If you want to mask off any areas of your skull to keep them free of paint, such as the horns, do it now.
Below: Our cow skull after the base coat had dried, and with additional tape on her horns to keep them free of paint when being dipped; spray paint; and an old mineral tub (with a black plastic garbage bag for a liner) to use as a dipping container. We wound up using a larger tub.
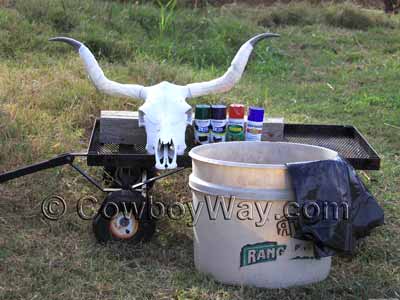
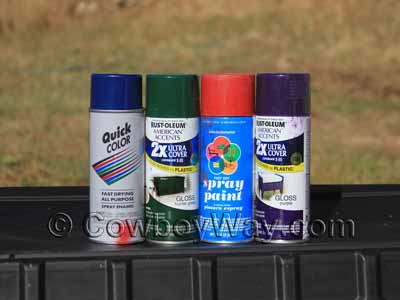
Below: A close up of the colors of spray paint we used on our skull. From left to right: Blue, dark green, red, and purple.
Step Three
Fill your container with water. If you want to keep the container free of paint residue, line it with plastic first. Make sure the water temperature is within the recommended temperature range on the can(s) of spray paint.
Step Four
Begin spraying paint onto the surface of the water. Spray one color, then a different one. Add the colors of paint however, whenever, and wherever you feel like it. Be generous with the amount of paint that you use.
Below: Spraying paint onto the surface of the water. You can spray one color at a time, or two different colors at a time.
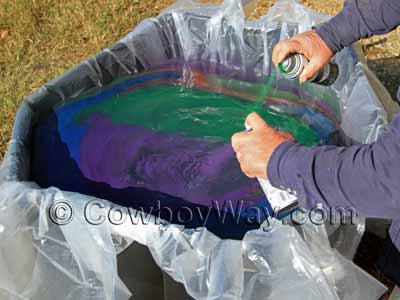
As you add paint it will naturally swirl around the other colors.
Below: Adding more paint.
Step Five
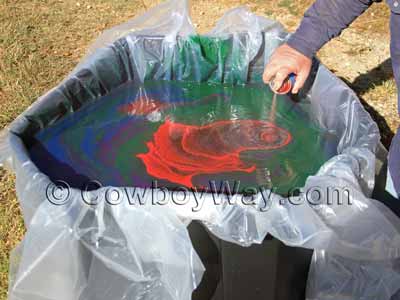
When there is a lot of paint on the surface of the water you can stop adding more. If you like, at this point you can take a stick and slowly and gently stir the surface of the water to swirl the colors and break up big blocks of color. Gently stirring the paint results in smaller streaks of paint swirling around each other, and is usually the preferred choice. In our case, we chose not to.
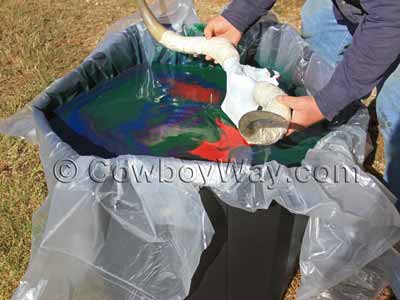
When you're ready, submerge your skull. Dip it slowly into the water, allowing the paint to gently flow into every nook and cranny. Continue slowly submerging the skull until it is completely under the water. If you're not dipping the horns, like we chose not to, then you won't need to submerge them.
Below: Beginning to slowly and gently submerge our skull.
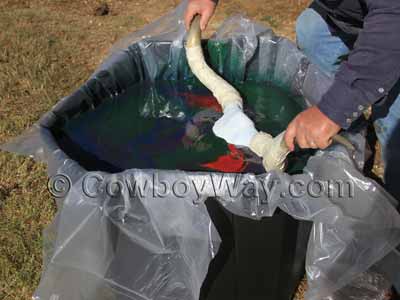
Below: Changing the angle slightly, and slowly continuing the dip......
Below: ......almost submerged......
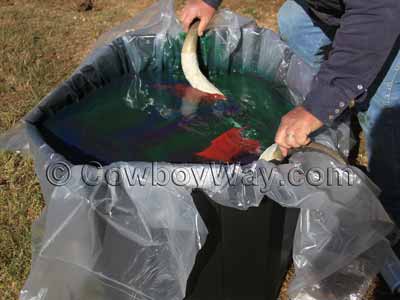
Below: ......and, finally, completely submerged.
Step Six
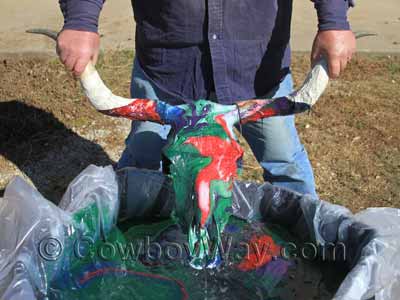
When your skull is completely submerged you're ready to lift it back up and out of the water. Before you lift it back out, you can choose to part the remaining paint on the surface of the water so the skull doesn't come into contact with it as its removed, our you can leave the paint where its at.
What's the difference? First off, neither way is right or wrong. If you part the paint before you lift the skull out of the water then the skull will get one coat of paint (the paint it received going in). This is usually the preferred method.
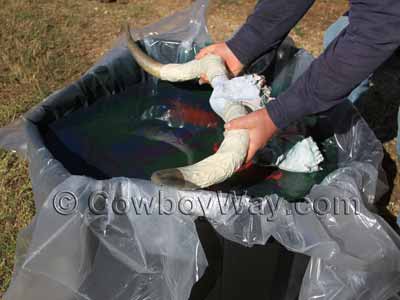
If you don't part the water, the skull will most likely come into at least some paint as it's lifted out, which might detract from, or possibly enhance, the paint job it received going in. In our case, we chose not to part the water.
Below: Our cow skull immediately after being lifted out of the hydro dip tub.
That's It, You're Done!
When your hydro dip is finished let your skull thoroughly dry. Since bone is porous, allow extra drying time not only for the paint but also for the bone of the skull.
When your skull is completely dry you can finish it off by spraying it with several coats of clear spray sealant. This is usually available in matte, semi-gloss, or gloss. While this is an optional step we definitely prefer to seal our skulls. Sealant not only helps to keep the paint looking fresh, it helps to keep dust from settling into the bone of the skull making it easier to dust or wipe off, and helps to prevent a dingy look over time.
Other Ways To Hydro Dip
Hydro dipping doesn't have to use spray paint. A similar method calls for placing hydrographic film on top of the water instead of spray paint. The film has a pre-printed pattern on it, and after it is placed on the water and activated (usually by spraying an activator solution onto it) the object is dipped and the pattern is transferred onto the object. Like spray paint hydro dipping, this method is well-suited for 3D objects because it also covers all dimensions of the object that is dipped.
You can often find hydrographic dip kits for sale on Etsy and also Amazon. NOTE: Many of these kits are complete with everything you need, while others only have one or two items to replenish an item you've run out of. Read the descriptions carefully to know what you are, and are not, getting.
How To...
… Care For Your Felt Cowboy Hat
… Care For Your Saddle Pad Or Blanket
… Close A Gate With A Chain Latch
… Estimate Cattle Age By Their Teeth
… Fishtail Braid Your Horse's Tail
… Make A Bridle Rack Out Of Tin Cans
… Make A Collapsible Wood Saddle Rack
… Make A Flag Boot Out Of A Horn
… Make Homemade Hoof Conditioner
… Make Homemade Horse Fly Spray
… Measure A Western Saddle Seat
… Put A Horn Knot On Your Rope
… Put A Speed Burner On A Honda
… Recognize Common Horse Colors
… Recognize Common Horse Face Markings
… Stop A Saddle From Squeaking
… Tell A Boy Cow From A Girl Cow
… Tell A Horse Skull From A Cow Skull
… Tie A Stopper Knot
Tie a stopper knot for the end of a rope, or a metal, rawhide, or plastic honda
… Tie A Stopper Knot For A Honda
Tie a stopper knot for a tied honda
… Understand Leather / Hide Thickness
… Weigh A Horse and Optimize Rider Weight
… Wrap A Saddle Horn With Rubber
You Might Also Like...