How To Fishtail Braid Your Horse's Tail
A fishtail braid is an attractive braid for your horse's tail.
A tail braided with a fishtail braid is flatter in appearance than a standard (right over middle, left over middle) 3-strand braid, and has a slightly more elegant look to it. A fishtail braid may look complicated to do, but is really very simple.
A completed fishtail braid.
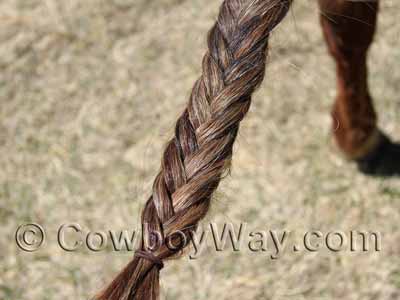
In the text and photos below we'll show you how to fishtail braid your horse's tail.
First, though, a few words of caution:
- Never leave a horse with a braided tail unattended. If the horse should get its tail caught on something a braided tail can hold surprisingly well, possibly causing the horse to struggle and injure itself.
- Don't braid any type of braid too tightly over or near the tail bone. This can cut off circulation and cause minor or serious injury. You'll notice in the photos below we started our braid below the tail bone so as not to involve it in the braid at all.
- Last but not least: Be cautious when handling or riding a horse that has had its tail braided for the first time. A horse that hasn't gotten accustomed to a braided tail might swish its tail and accidentally give itself a surprising whack with the braid. This may cause some horses to spook, bolt, or buck.
The Fishtail Braid
Step 1: Begin by brushing your horse's tail until it is free of dirt, tangles, etc. Then divide the hair into two equal sections.
Divide the tail hair into two equal sections.
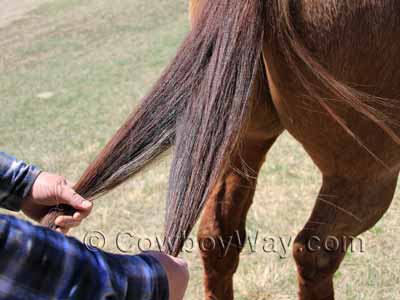
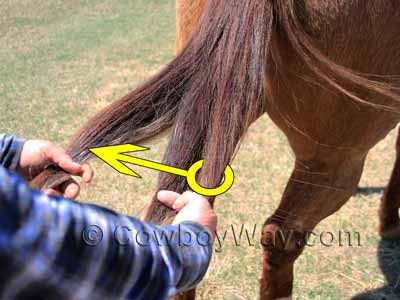
Step 2: You can begin the braid from either the right or left section. To begin from the right like we did in the photos below:
- Take a piece of hair from the outside of the right-hand section, cross it over the top of the hair in the center, and add it to the inside of the left-hand section.
You can take large or small pieces of hair to cross over, depending on the finished look you want.
Take hair from the outside of the right-hand section and add it to the inside of the left-hand section.
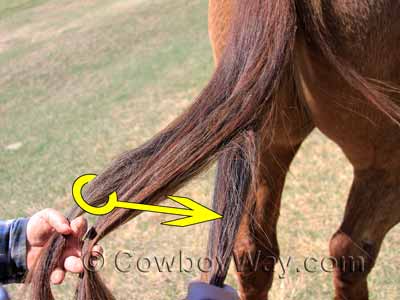
Step 3: Now do the same thing, this time going from left to right:
- Take a piece of hair from the outside of the left-hand section, cross it over the top of the hair in the center, and add it to the inside of the right-hand section.
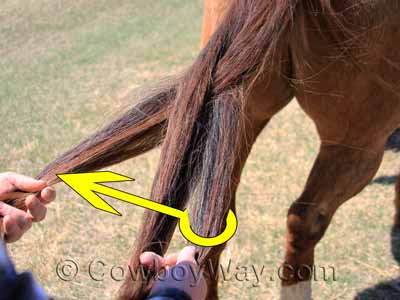
Take hair from the outside of the left-hand section and add it to the inside of the right-hand section.
Step 4: Now you simply repeat the steps working your way down the tail.
Repeat the steps and continue on down the tail.
In this photo we've continued braiding down the tail. You can see the braid has started to take shape.
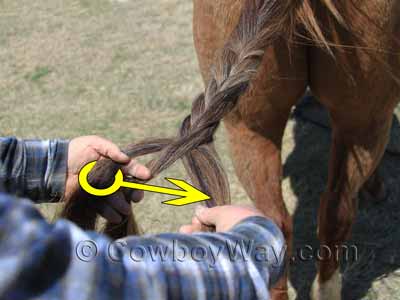
That's It!
Step 5: Continue until you are as far down the tail as you want to go. When you're finished, secure the bottom of the braid with an elastic band.
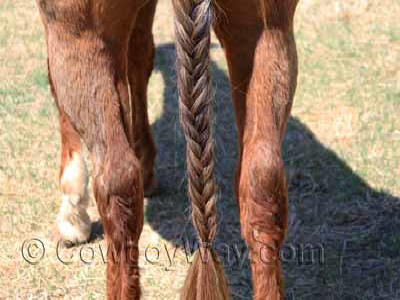
If you like, when you're done braiding you can widen the fishtail braid slightly by gently pulling it outwards on each side all the way down the braid. This isn't necessary, but can create a fuller look. If you're curious, we did NOT widen the finished braid in the photo above.
How To...
… Care For Your Felt Cowboy Hat
… Care For Your Saddle Pad Or Blanket
… Close A Gate With A Chain Latch
… Estimate Cattle Age By Their Teeth
… Fishtail Braid Your Horse's Tail
… Make A Bridle Rack Out Of Tin Cans
… Make A Collapsible Wood Saddle Rack
… Make A Flag Boot Out Of A Horn
… Make Homemade Hoof Conditioner
… Make Homemade Horse Fly Spray
… Measure A Western Saddle Seat
… Put A Horn Knot On Your Rope
… Put A Speed Burner On A Honda
… Recognize Common Horse Colors
… Recognize Common Horse Face Markings
… Stop A Saddle From Squeaking
… Tell A Boy Cow From A Girl Cow
… Tell A Horse Skull From A Cow Skull
… Tie A Stopper Knot
Tie a stopper knot for the end of a rope, or a metal, rawhide, or plastic honda
… Tie A Stopper Knot For A Honda
Tie a stopper knot for a tied honda
… Understand Leather / Hide Thickness
… Weigh A Horse and Optimize Rider Weight
… Wrap A Saddle Horn With Rubber
You Might Also Like...
